|
|
 |
|
|
|
 |
|
|
|
|
|
|
|
|
|
|
|
|
|
|
|
|
|
|
|
|
|
|
|
|
|
|
|
|
|
|
|
|
Rotating Wheels
By far, the most common form of skate maintenance will be rotating your
wheels. Typical skating motion can be described as pushing off your left
skate followed by pushing off you right skate and the cycle repeats. As
time goes on the inside portion of your wheels get worn. That is, the
right side of your left skate wheels and the left side of your right skate
wheels become more and more slanted. And since you tend to lean forward
as you skate the wear is worse in the front wheels. After a while a typical
wheel on the left skate will look like this. As you can see that
|
|
|
|
|
 |
beautiful parabolic shape is gone...never to
return again. I said it before and I'll say it again, if I ever win the
lottery I will have someone put spanking brand new wheels on my skates every
day. Okay, every week. The only thing to do is rotate the wheels so that
the slanted side is on the outside part of the skates. Then the whole process
starts again. Eventually your wheels acquire an inverted "V" shape.
The way I perform the rotation is as follows. I take off all my wheels (from
both skates) and line them up in a long row. I then put them is size place
order. Then divide the wheels into two stacks placing the biggest in one
stack followed by the next biggest in the other |
|
|
|
|
stack, etc. One stack will go on your left
skate the other on the right skate. You want to put the wheels back on your
skates so that, for a given stack, the largest diameter wheel goes in the
front position, followed by the second largest diameter wheel followed by
the smallest wheel in the third position and finally place the second
to smallest wheel in the back of the skate. Make sure when you are putting
the wheels back on the skates that the slanted/worn part of the wheel is
facing the outside. If your wheels are very worn prior to rotating them
your skates will feel weird when you start to skate again. But trust me
the sharp edges wear very fast and your skates will feel normal again in
a very short time. |
|
|
|
|
Bearing Maintenance
Maintaining your bearings is very important and I won't lie it's a dirty
job. Bearings have gotten cheap enough and they last long enough that
a lot of people simply buy new ones once they feel the time has arrived.
But if your an environmentalist, and like me, you feel that the bearings
have life left in them why not clean them? My honey, June would also say
that I'm CHEAP. And sometimes just one bearing locks up and then buying
a whole set is a waste of money. So this is how it's done. This will take
1-2 hours to do.
A word of warning here. WD-40 is every mechanics favorite friend but
WD-40 is actually a degreaser. That is, it removes grease and grit. So
after you spray it on something like a bearing it may appear to run smoothly
again but in fact you are removing the grease. We don't want to do that.
We want to clean our bearings and then regrease them.
Removing Your Bearings
I thought that removing the bearings was pretty simple but my cousin
Shelly called me one night not knowing how to do it so I decided to include
this on the web site. After you remove all your wheels you will need to
remove the bearings from them. Some skates have "floating" spacers
between the bearings while others have "captive" spacers. The
differences are unimportant although removing the bearings from the wheels
is slightly different. If the bolt that goes through your skate wheels
is 1/4" in diameter then you have "captive spacers" if
the bolt is 5/16" in daimeter then you have "floating"
spacers
|
|
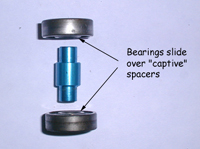
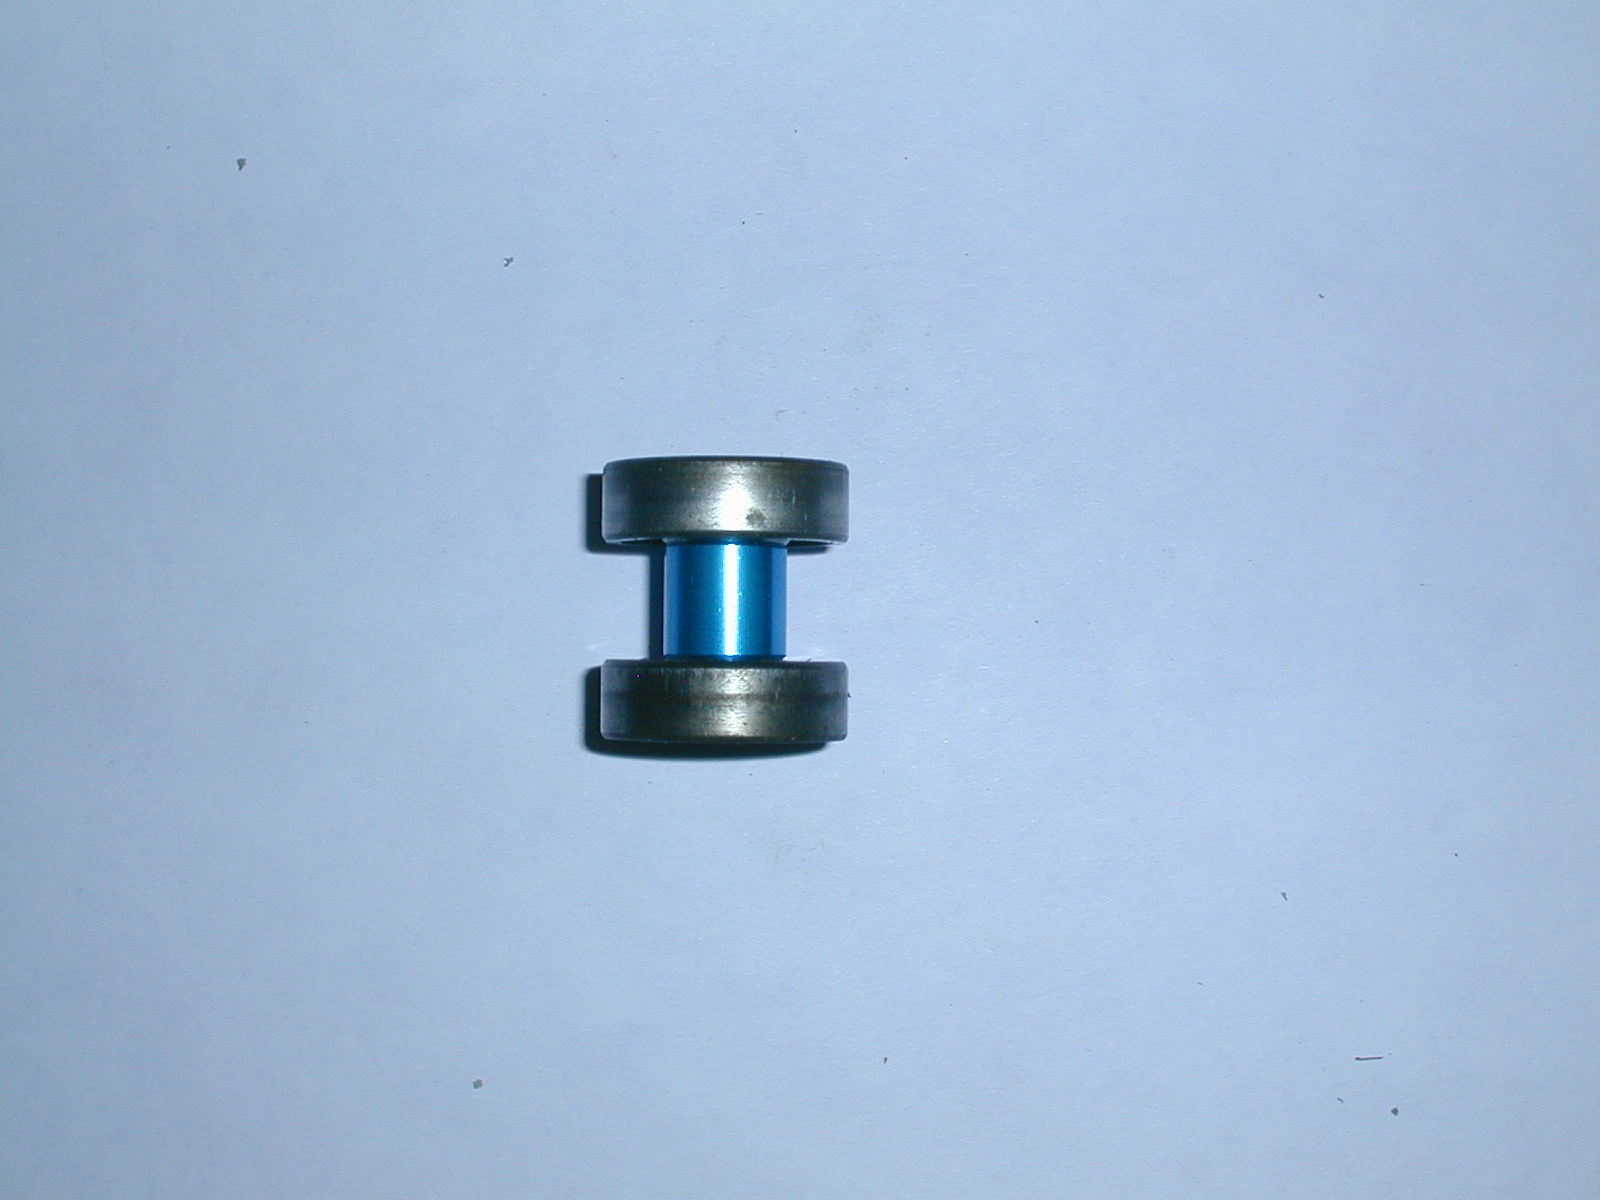
Here is a cut-away view of a wheel containing
a "captive spacer." This particular spacer is made of blue annodized
aluminum although many spacers are made of a white nylon plastic. The bearings
slide on to the spacer as shown in the two right photos |
|
|
 |
|
|
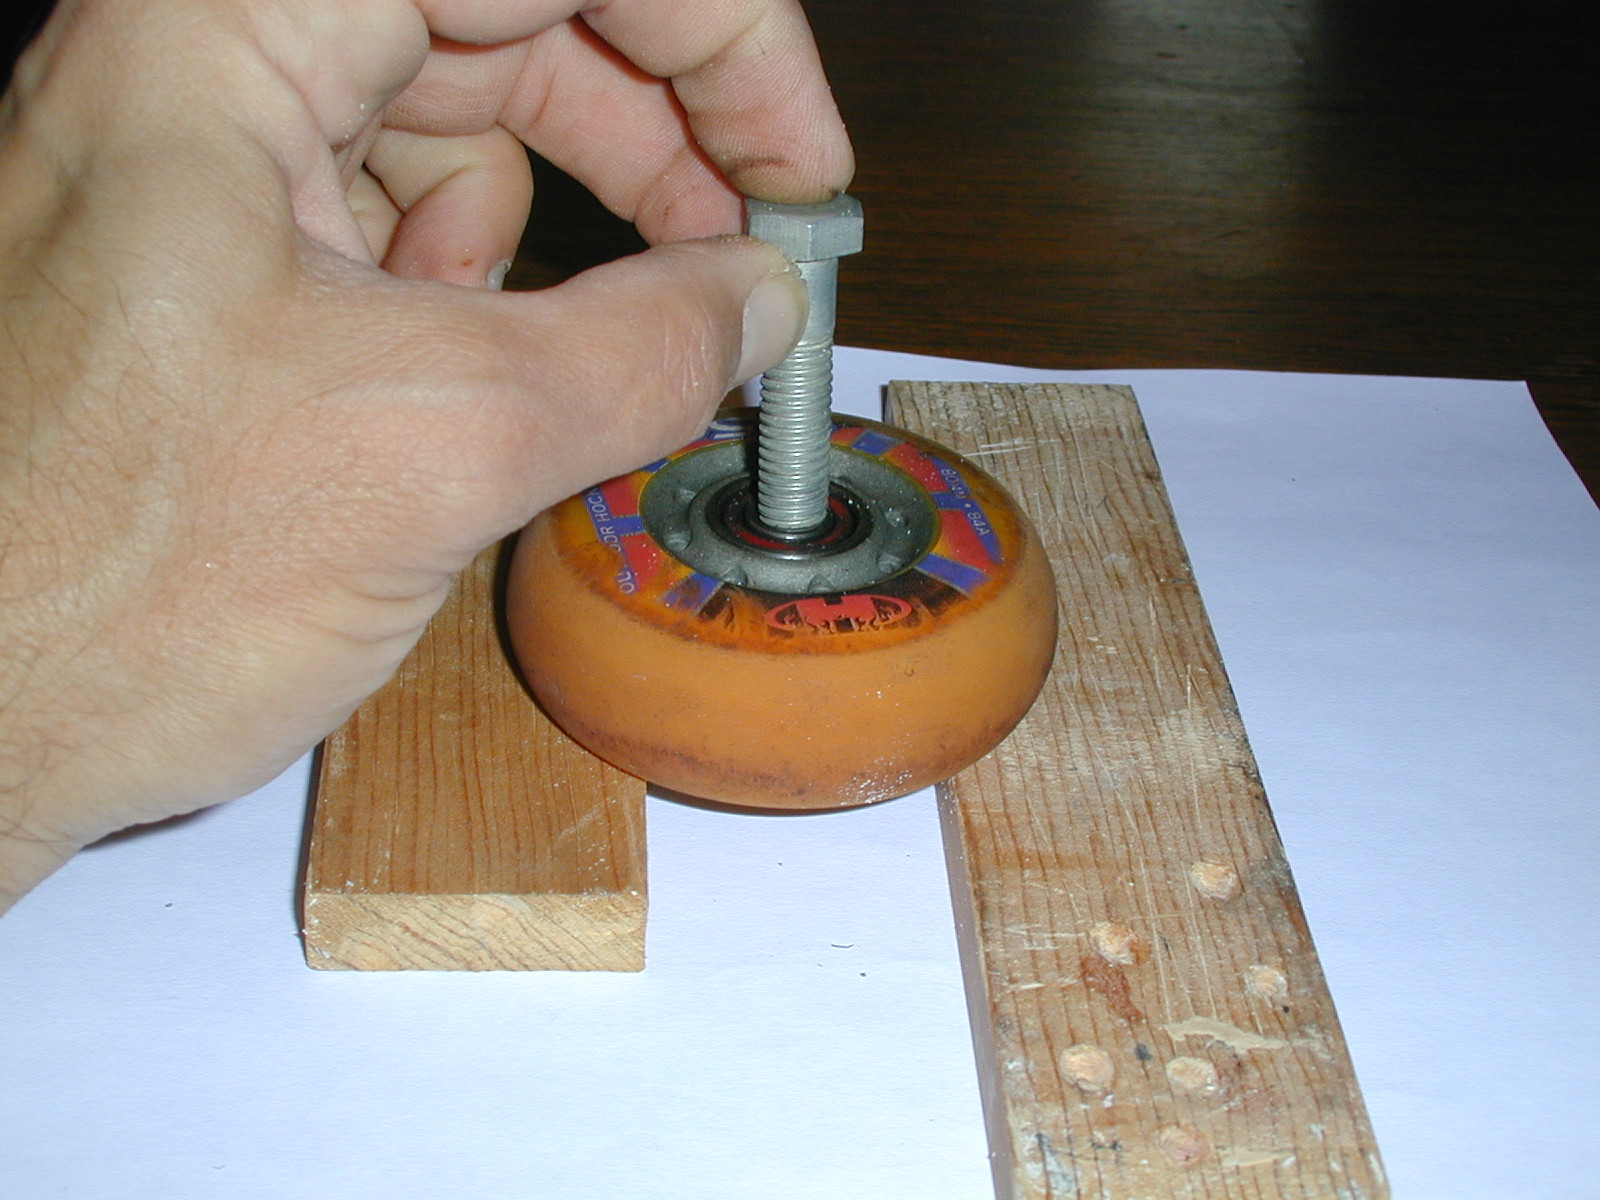 |
To remove these bearings there is
an inexpensive tool that makes the job easier but you can alternatively
use a 5/16" daimeter bolt or an old spacer if you have one. Simply
prop the whole wheel up on some wooden blocks and center the bolt over the
spacer. Make sure you are not on the inner race of the bearing but on the
spacer. Also make sure that there is a gap |
 |
|
|
 |
|
|
|
|
between the wooden blocks that will allow the bearing below to come
out. Tap gently with a small hammer until the bearing below starts to
come out. Keep tapping until the entire assembly comes out. Here you see
the lower bearing starting to come out. You will have two bearings and
one spacer for each wheel.
|
|
|
|
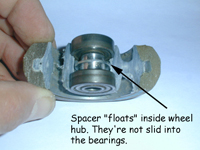
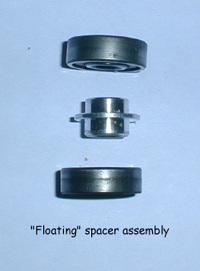
To the right is a photo of a "floating"
spacer. Since these spacer do not slide into the bearings the bolt that
goes through them is larger and is equal to the bore of the bearings, 5/16"
diameter. Further to the right you see the exploded view of the assembly.
Again, an inexpensive tool is sold to remove these bearings but alternatively
you can place a 1/4" daimeter bolt through the first bearing and on
through the |
 |
 |
|
|
|
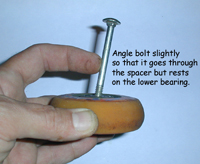 |
"floating" spacer. Then angle it a
little so that it rests on the top surface of the lower bearing. Now it's
time to gently tap the bolt. I do emphasize gently. Rotate the bolt to different
sides of the lower bearing as you tap down. Do not bang hard or you will
damage the bearings. |
|
|
|
Once the lower bearing is removed you can flip
the wheel over and use the same technique on the other side. Just be gentle.
Sometimes they are a bit hard to |
|
|
|
remove and you must tap them all around the rim to get them free, not
unlike loosening a jar top. Once this is done seperate the bearing from
the spacers. Don't lose any thing. There are eight wheels, eight spacers,
and sixteen bearings. I put them in cups.
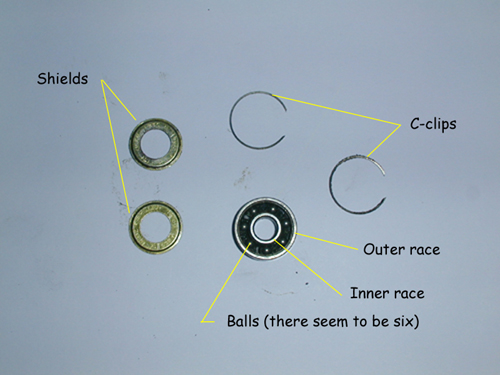
To clean the bearings properly you must remove the shields. Each bearing
has a shield on the top and back side to protect it from dust and debris.
Some companies will tell you to remove only one of the shields but trust
me it's much better to remove both of them. I told you this would take
a long time. If your bearings don't have shields they're probably crumy
bearings and not worth the trouble to clean them. To remove the shields
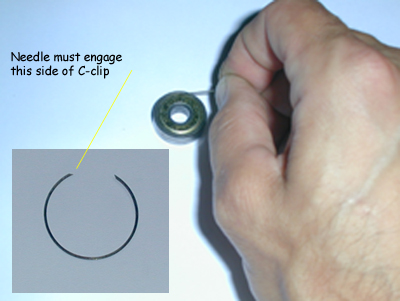
you must remove the "C"-clips that hold them in place. Use a
needle and slide it around the rim of the bearing until it engages the
part of the C clip that is angled (see photo)
|
|
|
Note here that one side of the C-clip is angled
so that the needle will engage with it while the other side is angled in
the other direction and the needle will slip off of it. Since you don't
know the C-clip's orientation you will have to feel for the engagement.
Once you feel the needle go in pry out the C-clip. Be careful because these
babies can go flying off and you probably won't find it. I place my hand
over the bearing to catch the flying C-clip. Once removed, the shield is
free to come off. However, removing it can still be a bit maddening.I frequently
pick up the bearing and throw it on the floor so that its edge hits |
|
|
the floor just right. This usually knocks out the shield. If not, throw
it again. Once you have removed the C-clips and shields you will expose
the bearing's cage and balls. Now the hard part is over. At this point
you will have, sixteen bearings, thirty two shields and thirty two C-clips.
Don't lose them!
|
|
|
|
Now you need to clean the bearings. The best
thing to do and the best environmentally sound thing to do is buy one of
the many citrus cleaners sold at skate stores. Soak the bearings in the
cleaner for a good while (20 minutes or so). When done you can run them
under the faucet and allow the water pressure to push away any stuck on
debris. Now use a blow dryer to dry the bearings so that they don't rust. |
|
|
|
If you don't have a blow dryer perhaps it's
better to skip the faucet cleaning step. These bearings will rust if they
get wet. Allow the bearings to dry completely. Now you are ready to apply
the grease. Let's talk a little about grease. I work in a machine shop that
has a numerically controlled milling machine that uses a high pressure grease.
It's thick and red in color and basically really top of the line stuff.
But if you can't get that there are many others out there. I like it to
be thick. That way it stays in the bearing. Some products claim to be lightening
lube but they're too thin and I think they will simply run out of the bearing.
Another good product are these teflon greases sold in bicycle shops. It
is often white in color. The |
|
|
|
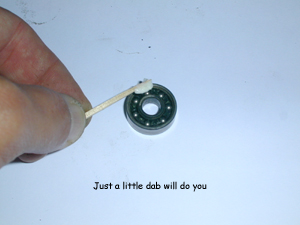
key here is to not put too much grease in the
bearings. If you put too much grease in them the balls will not rotate as
the bearing spins. Rather they will slide because there is too much grease.
You want to avoid this at all costs. Put a little dollop of grease in the
bearing and try to spread it around. Rotate the bearing so it gets evenly
distributed. Now it's time to put back the shields. Get the C-clip started
by angling it into its internal groove (lower right). Then give the finger
roll until you here it click into position. I sometimes run the needle around
the ourtside of the shield |
|
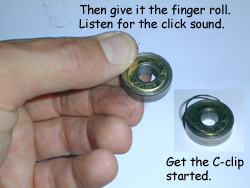 |
to make sure the C-clip is seated properly. Only thirty one more C-clips
to go and you're done.
Well, you may never do this again but at least you know how to. Cleaning
your bearings is good for the soul and makes you a better person. I don't
know about making you a better skater.
|
|
|
|
Additonal Maintenance
I don't know of any other maintenance for skating other than reminding
you to ocassionally wash your wrist guards as they will eventually get
a bit funky. But remember to always examine your skates.
|
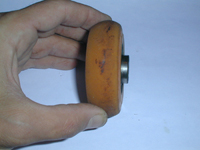
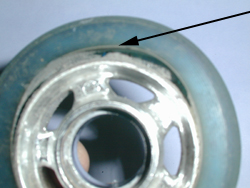 |
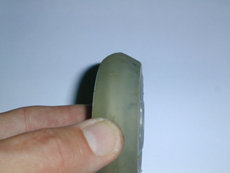
When the wheels get pretty worn, what's left
of the polyurethane wheel will become precariously close to the inner plastic
core of the wheel hub. When this happens the polyurethane wheel will break
off the core. The wheel is said to have "decored." Here you can
see the arrow pointing the area that is starting to decore. The tire is
literally pulling away from the inner core. This is dangerous because your
wheel will immediately start to rub against the frame preventing it from
freely rotating. The end result is often an immediate and sometimes painful
fall. So keep your wheels in check. If this wheel were still in use I would
estimate that in less than 5 minutes the entire tire would come off. It
happened to me once when |
|
I was skating and resulted in a wicked fall. Just remember. when skating
becomes slow and unresponsive check your wheels and your bearings. I skate
to work almost every day (around 3 miles each way). I also do a lot of
skating on the weekends. I go through a new set of wheels about every
6 weeks and I rotate my wheels almost every week. Such is the life of
an avid skater.
Remember to check for other things like missing rivets, cracks in the
wheel frames, worn laces, etc. A lot is riding on your skates so inspect
them as you would your car.
|
|
|
|
|
|
|
|
|
|
|
|
|
|
|
|
|
|
|
|
|